How to format a drive from File Explorer in Windows 11
Formatting a drive from File Explorer in Windows 10 and 11 is a very simple task. Generally we use it for secondary disks or USB devices, it's something we can do without complicating things too much and best of all, we don't need third party software. Windows gives us all the tools we need to do this in the best possible way.
Format a drive from Windows 11 File Explorer
It is very important that we back up all the data we have on the drive that we are going to format. Formatting removes all the data it contains; Therefore, it is necessary to make a backup, even if it is, of those data that we do not want to lose.
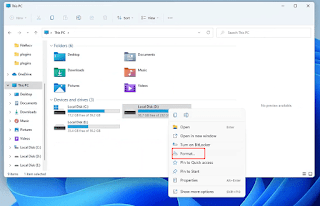
To get started, we will have to make sure that the disk we want to format is connected and recognized by Windows. For this we will right-click on "Start" and then click on "File Explorer". Obviously, we can open File Explorer directly from a folder.
After opening File Explorer, we will have to click on “This PC” in the left sidebar. We will right-click on the unit we want to format in the "Devices and Modules" section, and then click "Format" in the menu that appears.
What are our formatting options?
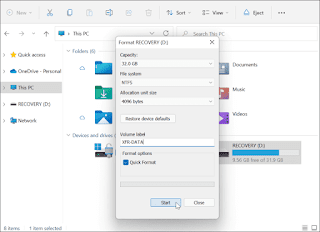
After opening the format window, we will have a variety of options, which we will try to explain in detail below:
Format the drive from File Explorer.
Capacity: The capacity will obviously be the space left on the said hard drive after formatting. Here we must consider that the formatting process occupies some space on the drive.
File system: This will be the data structure that decides how files are stored on the drive. There are three data systems to choose from: FAT32, NTFS, and exFAT. If we want to use the drive for an operating system like macOS and Windows, we will have to use exFAT. For Windows 10 or 11, we will be using NTFS. FAT32 is limited to 4 GB and is clearly not optimal for modern operating systems. In the case of macOS, exFAT is recommended.
Allocation unit size: The size is stable at 4KB for NFTS by default, which is small. Tweaking this was something users decided to do a long time ago when all there were were slow drives. Nowadays this value can be kept by default without problems.
Volume label: In this case it is simply the name we want to give the unit.
Format options: We have quick format and full format, if we use quick format, only the file system table and root folder will be deleted. Which means the data is still on the drive and can be restored; However, during disk usage, this extra data is overwritten. On the other hand, if we do a full format (it takes longer), then Windows will try to find the bad sectors and write zeros in each of them; This way it removes all the data and makes it impossible to recover.
Format the drive quickly and easily
We already have all the options configured, so it's time to hit "Start" to start formatting. We will see a warning message, it's normal and we will have to click "accept".
The time it takes to format will vary depending on the size of the drive and the type of format we choose. Fasting, in general it does not take more than two minutes at most, a full person can take a long time so a lot of patience.


Comments
Post a Comment